|
The Engraving Process
The basic
method of hand engraving has not changed for centuries. However, with the
advent of modern tools, today's engravers are given advantages that
previous engravers did not have at their disposal. Computer technology
allows the use of photo editing or vector-based drawing programs, thus
facilitating the design process. Using computers and printing
technologies, an artist can now successfully and accurately lay out a
design from the computer onto the item being engraved. Modern pneumatic
gravers are available in the same size as the graver of old, allowing ease
of control of the graver cut.
 Artistic Design Concept Artistic Design Concept
Before beginning the engraving process, the engraver must visualize a
design concept, and view the item to be engraved for its shape, its period
styling, its value, materials, and contours. There are many things to
consider. If the engraving is for a customer, certain boundaries or
limitations may arise to suit the customer's price and taste.
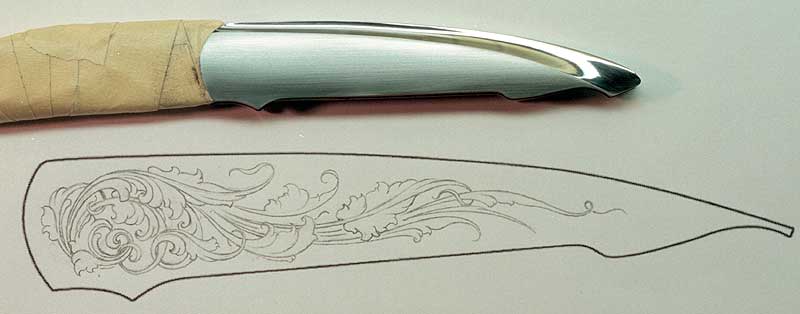
Preparing to Draw the Design
The item being engraved must be accurately outlined. This can be achieved
using a variety of methods. The simplest method is the smoke print. This
method involves using the smoke from a kerosene lamp, candle, or
equivalent to cover the surface with carbon smoke "inking". The item is
held high over the flame so as not to heat its surface. This is important
when the item contains non-heat resistant materials. Another outlining
method is to use printer’s ink over the area. Once the surface has been
blackened by smoke or printer's ink, clear tape is delicately placed over
the area. When the tape is removed, the smoke or ink remains on the tape,
creating the exact shape of the item. An accurate outline is next traced
to be used as the design boundary lines. Another method is to use frosted
tape laid over the surface, then trace the item's shape with a pencil.
This method is less messy, but will take a little longer. In either case,
a clearly drawn outline is the base for the beginning of the drawing
process.
Creating the Final Design

Assuming a design concept has been determined, the next step is to make
rough sketches. Sketching continues until the artist has achieved the
theme's desired flow. Refinements are slowly introduced, while maintaining
the initial feel of the art work. Imagination, creativity and familiarity
with engraving styles are important factors. The more time spent creating
a design to achieve exactly what is envisioned, the better the final
product will be. This also holds true for the quality of the drawing; the
better its quality, the better the reproduction will be when reduced to
scale for image transfer (layout of the design onto the metal).
Designs may
also be drawn directly on the item, thereby bypassing many steps. This is
possible when a familiar style of engraving is used that has been drawn
and cut many times by the artist, or if the engraving is of a less complex
design. It is usually best to plan the design on paper, allowing the
revisions of drawings at any time prior to the actual engraving process.
There are many methods for transferring the design or layout onto the
surface that is to be engraved. One is to scratch the design on to plastic
mylar which is used to make an ink or smoke print transfer. Another method
is drawing with soft lead pencil on mylar, and pulling the lead up with
tape, eventually transferring the lead from the tape. A third method is
photographic transfer, and a fourth is done with a laser or inkjet
computer printer.
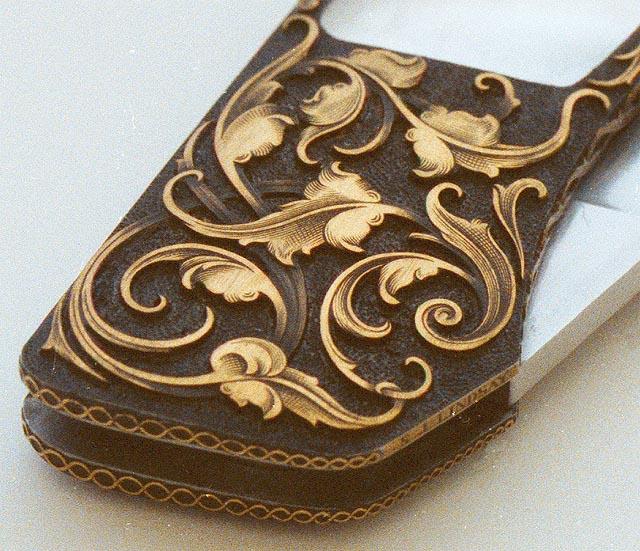
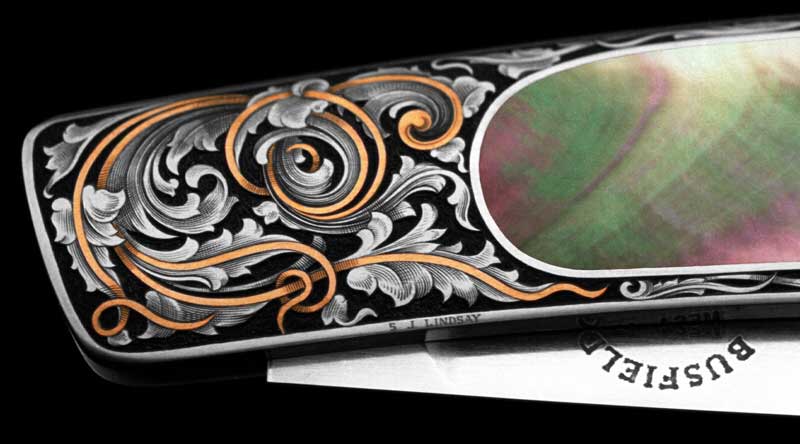
 The Technical Aspects of Engraving The Technical Aspects of Engraving
When the design has been transferred onto the metal, the engraving process
may begin. The most commonly used graver point is the square "V" cut
graver, which works well for a variety of engraving styles.
Several
details must be considered prior to the actual cutting of the pattern. If
the engraving is to be relieved, backgrounds will need to be removed,
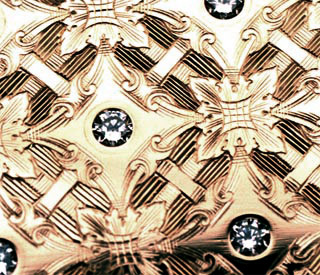
leaving the decorative pattern as a raised or relieved engraving. A
precious metal inlay may be part of the design. Gold, platinum, or silver
- wire or sheet would be cut and hammered carefully into the desired
areas. Both relief and inlay engraving share a common initial step: a
design is cut by following or tracing the transferred design’s outlines
with the graver. In the case of gold inlay, it must be determined which
area of the design will have gold. In those portions of the design, the
material will be cut out accurately by graver or dental air drill to a
predetermined depth, based on the thickness of the precious metal to be
inlaid. This cutout is called a “pocket”. When the pocket has been cut and
leveled to proper depth, a small channel is cut along the base of the
inner wall, creating an undercut. This could be called a "dovetail", a
term familiar to woodworkers. In this case, the undercut is needed to hold
the gold securely in place. The gold, having been cut to fit this pocket,
will now be placed in the pocket. Its surface will be carefully hammered,
usually with a brass punch. The hammering may be accomplished using a
pneumatic AirGraver and brass punch, or with a traditional hammer and
punch method. In either case, the result is the same. During impact, the
gold undergoes expansion, spreading into the undercuts of the pocket,
which secures it firmly in place.
 If
the inlay is to remain raised above the metal surface, steps are taken in
order to calculate the position and shape of the pocket. This is done
prior to the inlay by making a smoke or ink print of the pocket for later
use. This is a vital step, and cannot be overlooked, since the procedure
of inlaying precious metal involves hammering. Hammering, in turn, causes
the gold's surface to become mushroomed and cover the pocket’s outline
area. It is difficult to accurately trim excess gold. If too much is
trimmed, the gold may lack in the image area, and if not enough is
trimmed, the inlay will not fit the pocket shape. This can result in the
appearance of a fatter image or inaccuracies where detail is needed.
Because an ink or smoke print was taken of the pocket prior to inlaying,
this print can be laid over the mushroomed gold to determine exactly where
the pocket is located. If
the inlay is to remain raised above the metal surface, steps are taken in
order to calculate the position and shape of the pocket. This is done
prior to the inlay by making a smoke or ink print of the pocket for later
use. This is a vital step, and cannot be overlooked, since the procedure
of inlaying precious metal involves hammering. Hammering, in turn, causes
the gold's surface to become mushroomed and cover the pocket’s outline
area. It is difficult to accurately trim excess gold. If too much is
trimmed, the gold may lack in the image area, and if not enough is
trimmed, the inlay will not fit the pocket shape. This can result in the
appearance of a fatter image or inaccuracies where detail is needed.
Because an ink or smoke print was taken of the pocket prior to inlaying,
this print can be laid over the mushroomed gold to determine exactly where
the pocket is located.
The next
stage involves leveling of the inlay surface. This can be achieved by
filing, sanding and polishing to the predetermined height of the image
being inlaid. Once the inlay surface is leveled and scratch-free, the gold
can be detailed. Detailing may include line engraving, bulino, banknote
techniques, or sculpting. The process is somewhat easier if the gold inlay
is to be flush and level with the base metal surface, since there are no
difficulties with mushroomed gold and pocket position. The surface is
simply filed, sanded, and polished flush.
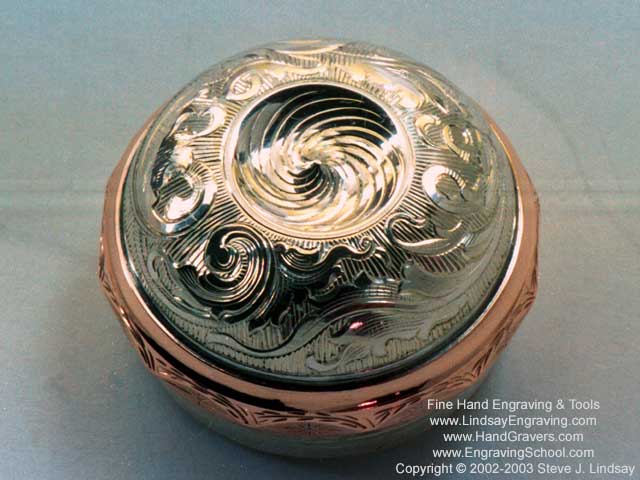
Relief
engraving is simpler by comparison to inlay work, and only requires the
removal of background around the design. This is accomplished by cutting
away the metal background and leaving the decorative motif design in the
foreground. The cutout background may be decoratively punched to create a
matted textured, or it may be lined to create interesting light reflection
effects. There are several methods in which the background may be
detailed. Some of them are punching, stippling, lining, and beading.
 Having
accomplished the above, detailing of the decorative motif will begin. This
step is labeled as shading. Shading is the process by which multiple,
tightly grouped fine lines or dots are applied in order to achieve
light-to-dark contrasts. This defining step can raise or lower the overall
quality of the engraving. Correctly produced, it will add life to the art.
If shading is not fully understood and expertly executed, however, the
engraver runs the risk of lowering the quality of his previous efforts.
Shading is the highlight of quality engraving, and is perhaps the most
difficult area for the beginning and intermediate level engraver to
develop proficiency. Collectors who recognize quality engraving examine
the shading and look for precision, continuity, and character in the
shaded areas. Having
accomplished the above, detailing of the decorative motif will begin. This
step is labeled as shading. Shading is the process by which multiple,
tightly grouped fine lines or dots are applied in order to achieve
light-to-dark contrasts. This defining step can raise or lower the overall
quality of the engraving. Correctly produced, it will add life to the art.
If shading is not fully understood and expertly executed, however, the
engraver runs the risk of lowering the quality of his previous efforts.
Shading is the highlight of quality engraving, and is perhaps the most
difficult area for the beginning and intermediate level engraver to
develop proficiency. Collectors who recognize quality engraving examine
the shading and look for precision, continuity, and character in the
shaded areas.
|